
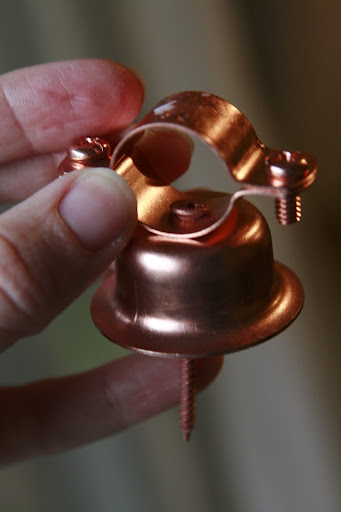 This $1.57 piece cost me lots of time. I actually went to 5 (yes 5!) different plumbing supply stores. In the end, I found them at Lowes. I actually found EVERYTHING I needed at Lowes. They were not, however, at Home Depot or any of the local places I went to. So, if you have a Lowes around you, and want to do this project, go there. And if you can, bring a picture of what you need. It's helpful.
2. After you have all your stuff gathered, it's the fun part. You just simply glue the glass pebbles to the plates in neat patterns, and then wait for at least 3 hours for it to dry. Do this in a VERY well ventilated area as the fumes are strong (we were in the homeschool room with the slider open) and make sure not to get any on your skin (we did this while Logan was napping).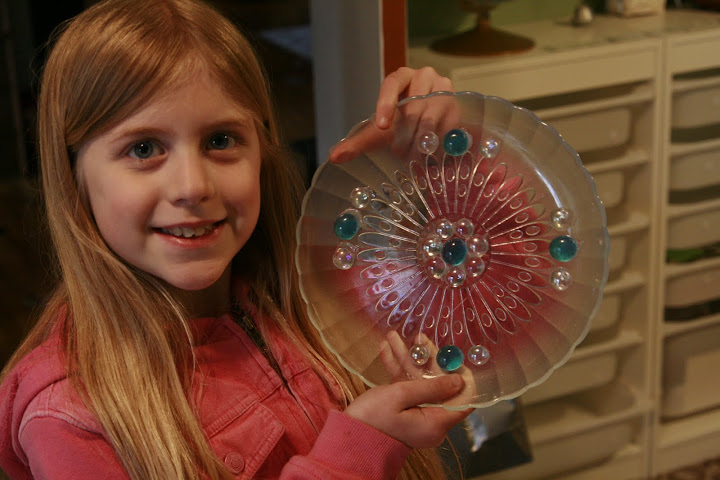 3. Just before you go to bed that night, remove the screws from the bell hanger, and glue the 'bell' part to the back center of your plate.
 4. The next morning, with the rubber mallet, pound the EMT pole into your soil, (you don't want glass tipping over) and use the screwdriver to secure the bell hanger onto it.
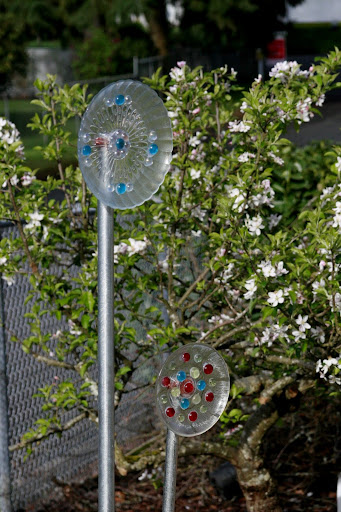
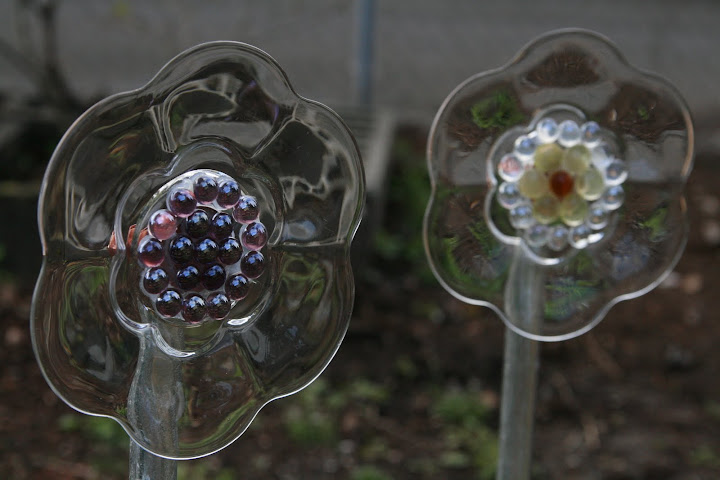
That's it! Once you find the stuff, this project goes together in a snap. And they are so beautiful!

28 comments
They certainly add interest to your garden. Our seedlings are at the same stage as yours. I think we may give this a go. When I first saw it I thought you were going to use heat to meld the glass together, which put me off! I think I could cope with silicone glue.
Thank you so much for posting how to do this. I'm totally going to have to make some!!!
They are beautiful!
Oh Val!
I just LOVE them and now I know what mystery part you were hunting for at the hardware store this weekend -- LOL!! Great job, I'm dying to make some yard gazing balls with thrifted/freecycled bowling balls and glass jems glued to them.
xoxo MaryLea
@ MaryLea: YES! That was the part. Stinking thing took me FOREVER to find. And what was funniest to me was how many plumbing specialists didn't know what it was! Ugh!
Yard gazing balls... My husband used to make those. The glass floats too. Sometimes, well rarely, I really miss his glass blowing days.
@ Everyone: I can't wait to see all the beautiful creations you guys make!
Very cool!
Yay! Your flowers look GREAT!!!
I just made 35 glass flowers this week, so I'm a little flowered out, but it was great to see someone else making them. I've made tons of them, but I still get excited when I'm putting together a new one.
My hands are really gluey though, 'gotta start wearing gloves.
P.S. To prevent the flower from tipping over when it rains, I put a piece of rebar in the ground first and then slide my stem over the top.
These are awesome mother's day (grandmother's) gift ideas!
Wow, these are so pretty! Thanks so much for the great idea. I'll be linking.
Very pretty! I love this idea, they're like sun catchers! Take a look at these garden spinner, I think this could be your inspiration for your next project.
what happens with the screw coming out of the bell part? i'm not quite picturing how you glue the bell part to the plate. i'm thinking that the screw would get in the way of the plate??? just can't picture it in my head....
re: bell screw question--sorry. i just re-read the instructions again, and saw where it said to remove the screw from the bell part. but then how do you get the bell part attached to the "hanger" part?
@Elizabeth - you remove the screw. :) There is no screw on any of mine. Then you are free to glue the bell portion of the hanger to the plate with no issue.
Hope this helps!
Blessings,
Val
Another way to do this instead of using the plumbing bell you can get a hockey puck and glide everything to it. And then instead of using the conduit you can drill a hole in the bottom of the puck and insert a piece of rebar in the hole. I like to paint the rebar first.
Hi - love these flowers and your application seems easiest. However, i agree with Elizabeth - how does the bell get attached to the clamp? I understand that you remove the screw from the bell to glue the bell to the plate. But the screw holds the bell to the clamp. I assume you have to glue the bell to the clamp, too?
Tracy
I still don't understand how the bell stays attached to the part that goes on the pole if you've removed the screw - is it welded to the other part? A photo of the back of the flower would help.
Hi Ladies! The bell portion of the hanger is welded to the first side of the clamp. The second side is screwed on around the pole and it will stay there for years. I have two out of the original 4 that we made for this tutorial that are still out there and still are up and beautiful. :)
Blessings,
Val
Thanks for the information. I've made these as a fund raiser for our son and daughter-in-law's adoption fund. We used 1/2" clamps and conduit pipe and Loctite 2 part epoxy. We've had a problem with some of the clamps popping off the back of the plates. Any suggestions on what may be the problem or how we can remedy it? Thanks.
I am not sure? We have had that happen when we bumped them with something (like a thrown football) but none just fell off. I wonder if using a window epoxy would help? Perhaps one set to your weather? (Ours here never gets too hot or too cold)
Good Luck!
Val
Thank you for the complete instructions-I've gathered glass pretties for years for one thing or another; the glass plate flowers always threw me off! It'll be a while, when the heat lets up! lol I'm going to post this on my Facebook and my blog, if that's ok?
Kudzu
www.kudzukween.blogspot.com
Louise
I've used hockey pucks glued to the plate with a 1/2" hole drilled into the bottom of the puck into which I inserted a 1/2" x 3 ft. piece of rebar.
The bell hangers work well for smaller glass flower projects. However, they do not work well for larger heavier designs. I found that out the hard way! My silicone glue gave way after a month or so in the garden and the glass flower was destroyed. :-(
I found a much easier way, and less expensive. Go to the plumbing section of any hardware store. You will find plastic elbows or you can use the t-shaped ones. They come in a crème color. You will want to get the 1/2 inch diameter or you can get one that has 1/2 and 3/4 inch elbow combo. Glue to the back of the plate. These work great with 1/2 dowel rods with I paint green. They only cost twenty nine cents. Thank you
@Deborah Marburger
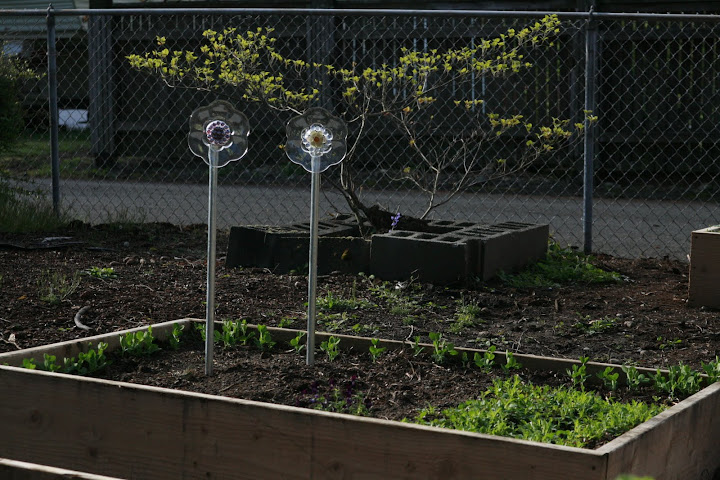
I have tried many plastic attachments for things like this in the garden because they are less expensive. I have found that when you put plastic in the sun it tends to crack easily and doesn't last. The two that are pictured at the top are still in my garden and have been for 6 years. The added expense was worth it for me to have such a long lasting project.
Val
@ Roxanne Nys
I am so sorry! I have had that happen too, but mine was from a football hitting it. :( I did not make my designs too heavy, but I am sure that the structure has it's limitations. If you find a better way to do the heavier designs, please let us know!
Val
I have not started a project yet but I have done a lot of research. I have read many posts by people have made heavier glass flowers and they used GE Silicone ll made for gutters and flashing and they said Ace Hardware is the place to buy it. In addition to that, heavier plates are easily held in place but using the same Silicone to glue a square bottle or bud vase to the back. Cut and paint your rebar and once glue is set, hammer rebar into the ground and slip your finished project on to rebar. I have all my stuff ready to go and will post my success or failure.🙏
Carren
This is interesting. I really love it! Thanks for sharing
What a beautiful thing this is and will be - both for the eyes and for the spirit!
Post a Comment